Installing on webOS 4.0 to 6.0
This guide covers installing the Digisigns Signage Player on LG commercial signage displays running webOS Signage 4.0, 4.1, and 6.0. It covers the standard remote (cloud) install, the USB offline method, and removing any pre-installed signage apps first.
Refer to this tutorial for instructions on LG webOS 2.0, 3.0, and 3.2 instead.
Supported LG signage models
| Player OS | Video | HDMI-IN | Portrait | Models |
|---|---|---|---|---|
| webOS Signage 4.0 | 4K / 1080P | Yes | Yes | BH5E, BH7E, BH7F, LAA015F, SH7E, SM5E, SM5KE, SVH7F, SVH7PF, UH5E, UH5PE, UH5F, UM3E, VH7E, VM5E, WP400, XE4F |
| webOS Signage 4.1 | 4K / 1080P | Yes | Yes | UM3D, UM3DF, UH5F, UH7F, 22SM3G, UL3G, UM3F |
| webOS Signage 6.0 | 4K | Yes | Yes | SM5J, UL3J, UH5J, UH7J |
Before you start
Missing any one of these is the most common cause of a failed install:
- Remove any existing signage software (ScreenCloud, Digisigns, LG SuperSign) — see Removing pre-installed signage apps below.
- Working internet connection (Ethernet LAN strongly recommended).
- Correct date and time on the display. Incorrect settings cause SSL validation to fail, blocking the connection to our servers.
- Firewall whitelisting completed — check the firewall requirements.
- Latest firmware installed. If the Application Type: IPK option is missing in Step 3, update the firmware first.
Firmware check
webOS 4.0 and above is required for the IPK installation method. To check the version, go to Settings → General → About this Device. If your display predates webOS 4.0, use the webOS 2.0–3.2 guide instead.
Installation — remote (recommended)
The remote method installs Digisigns directly from the Digisigns cloud server and always pulls the latest production build. Allow roughly 3–5 minutes.
Step 1 — Open EZ Setting
- Turn on the LG display and wait for it to reach the home screen.
- Press the Settings (gear) button on the remote control.
- Select EZ Setting, then select the SI Server Setting tile (the pink SI icon).
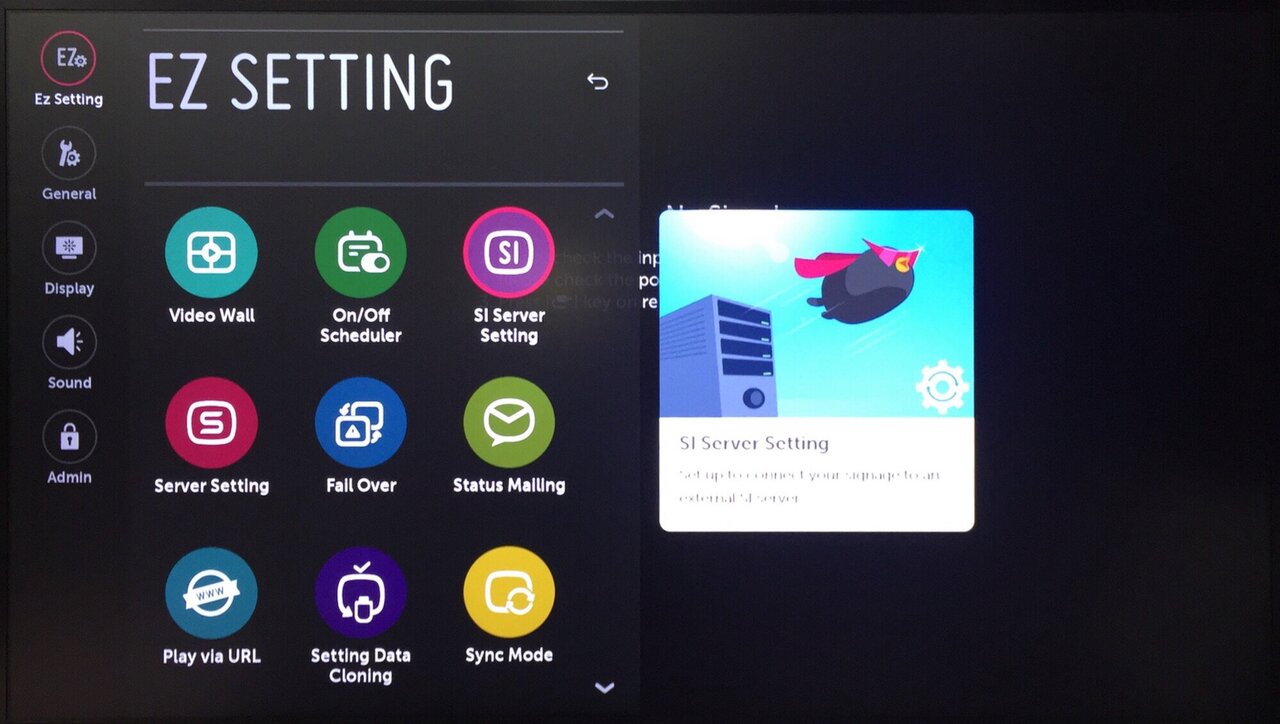
EZ Setting menu — select the SI Server Setting tile.
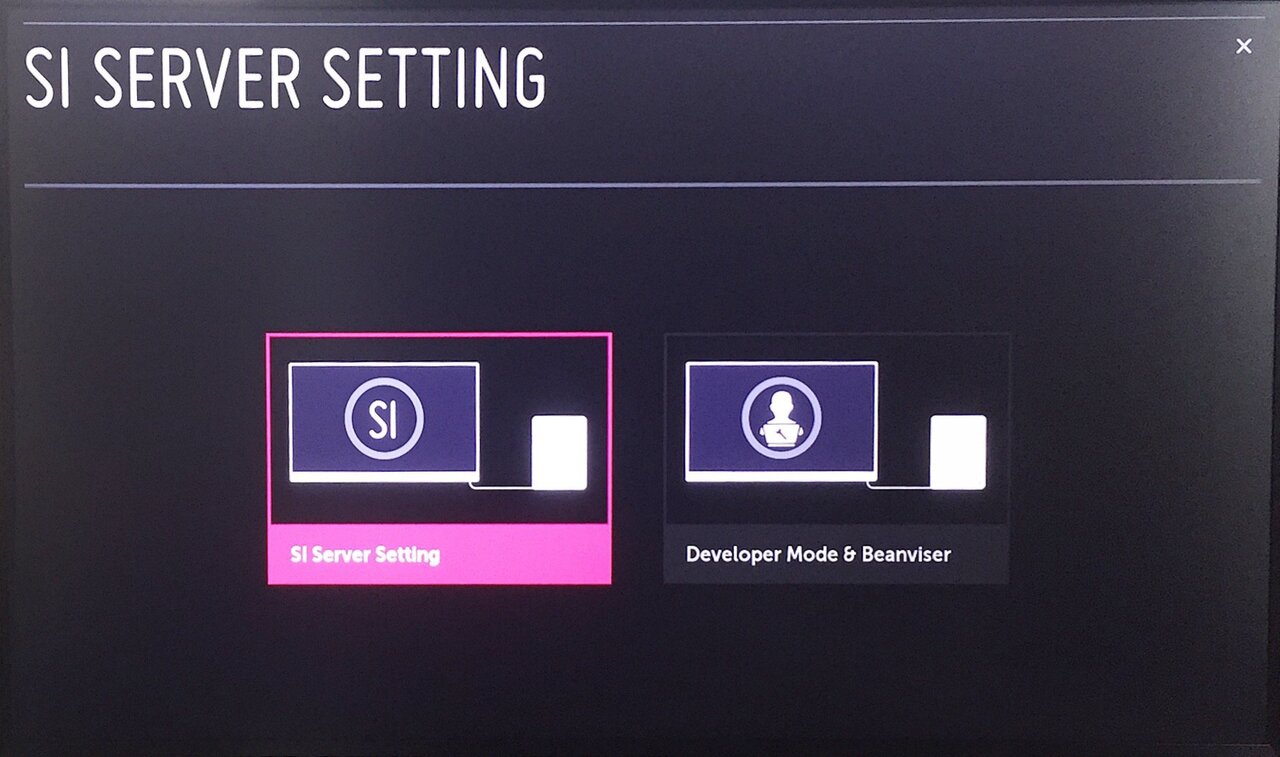
Step 2 — Enter SI Server Setting
- On the next screen, select the SI Server Setting option (left) and press OK.
Step 3 — Configure the SI Server parameters
Configure each field exactly as specified below:
| Field | Value | Notes |
|---|---|---|
| SI Server IP | Leave blank | Not required when using FQDN |
| Port Number | Leave blank | Not required when using FQDN |
| Secure Connection | Off | HTTPS is handled by the FQDN URL itself |
| Fully Qualified Domain Name | ON | Critical — toggle this on |
| FQDN URL | https://www.digisigns.in/lg.ipk | Type every character, including https:// |
| Application Launch Mode | Local | Launches the installed Digisigns app on boot |
| Application Type | IPK | If missing, upgrade the firmware first |
| Auto Set | OFF | Leaving it on disables remote player updates |
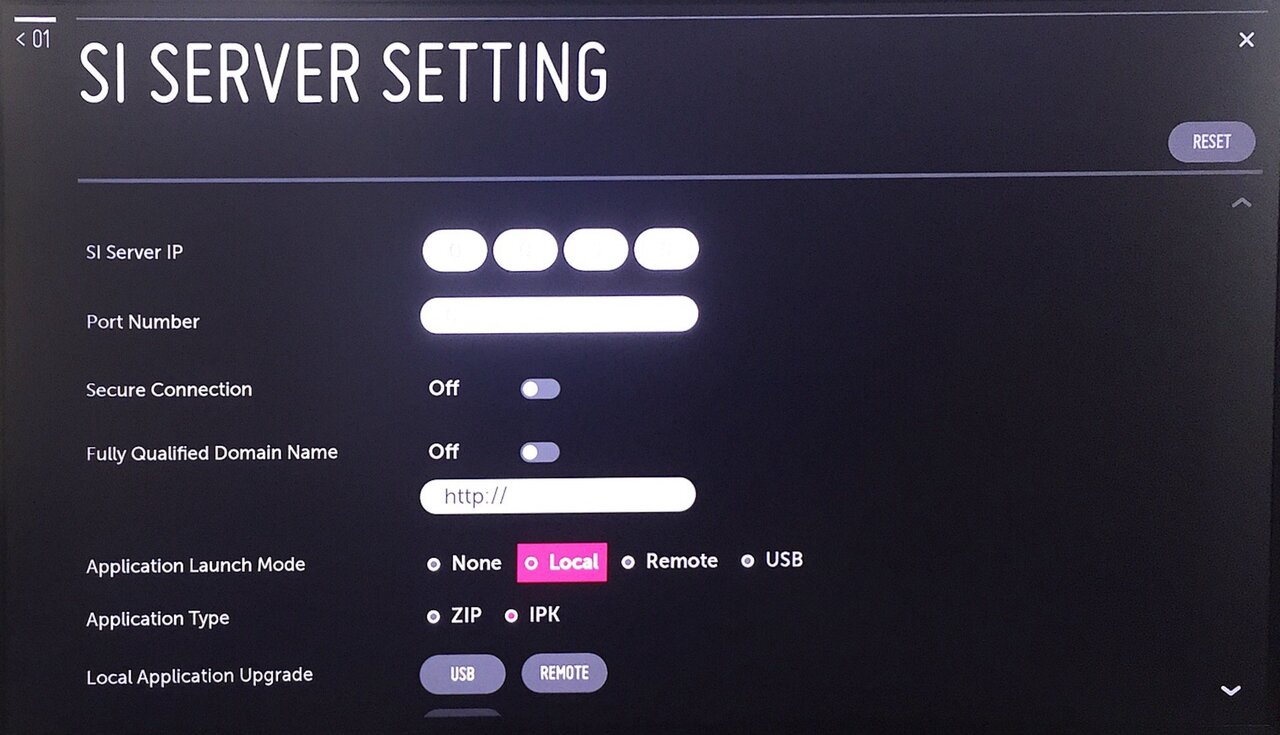
Set Application Launch Mode = Local and Application Type = IPK.
Auto Set must be OFF
If you leave Auto Set on, you will not be able to update the application remotely. Always keep this option off.
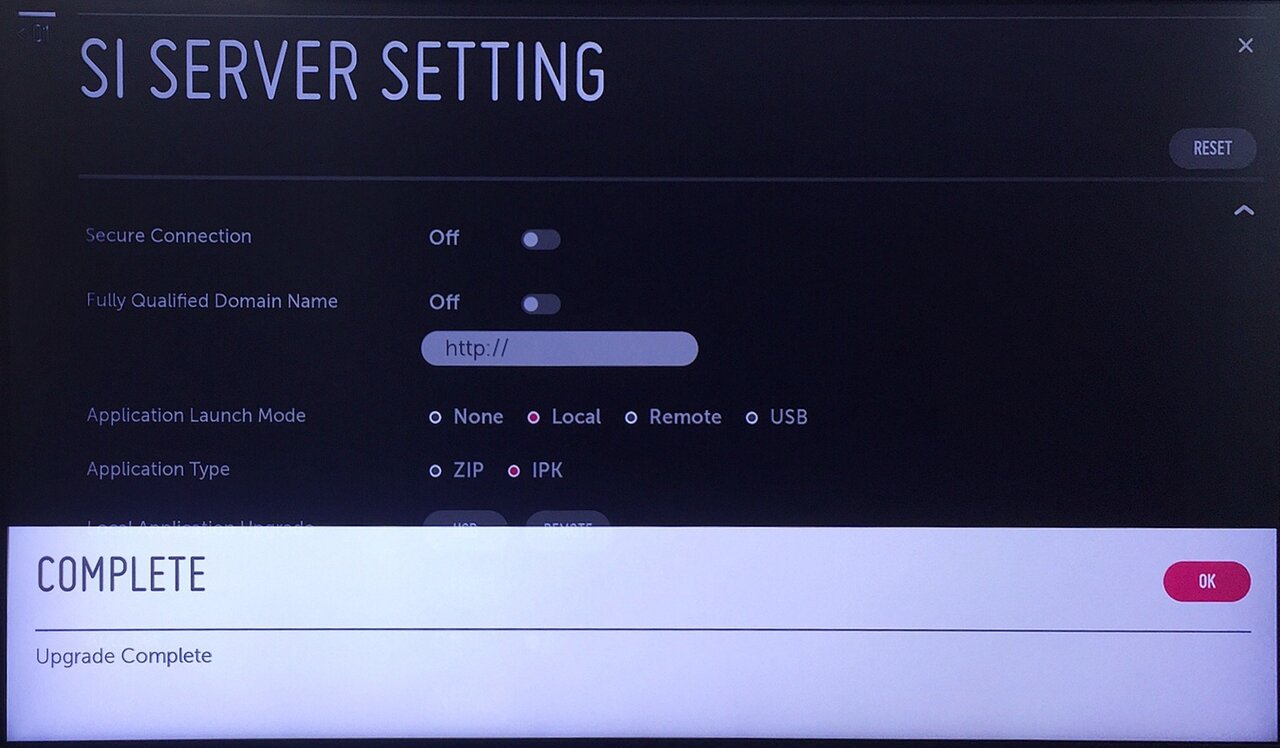
Step 4 — Trigger the remote upgrade
- Scroll down to Local Application Upgrade, select REMOTE (not USB), and press OK.
- On the Application Upgrade confirmation dialog, select CONFIRM and press OK.
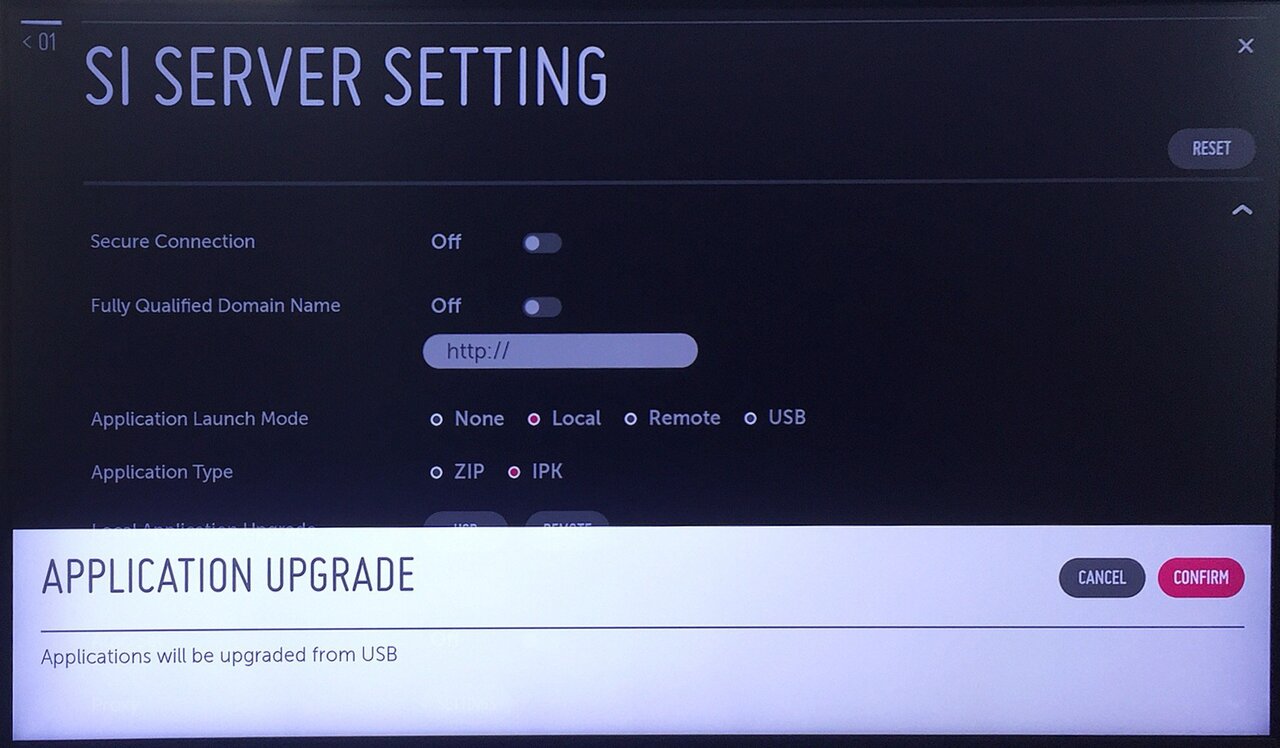
Do not power off the display
Once you confirm, the display downloads and installs the Digisigns IPK package. Do not unplug the screen or press any buttons until the Upgrade Complete message appears (typically 30 seconds to 2 minutes).
Step 5 — Confirm completion
- Wait for the Upgrade Complete message, then press OK.
Step 6 — Restart and pair
- Power the display off, wait 10 seconds, then power it back on.
- The Digisigns player launches automatically and shows a 6-digit activation code. Enter it at admin.digisigns.in → Devices → Add Device to pair the display, then assign it to a location and playlist.
Alternative — USB (offline) install
Use this only when the display is on an isolated network without internet access. Contact support@digisigns.in to obtain the signed IPK package.
- Copy the IPK file to the root of a FAT32-formatted USB drive (do not rename it).
- Insert the USB drive into the display.
- Follow Steps 1–3 above and set Application Type = IPK.
- At Local Application Upgrade, select USB, press OK, then CONFIRM.
- Wait for Upgrade Complete, then restart the display as in Step 6.
Removing pre-installed signage apps
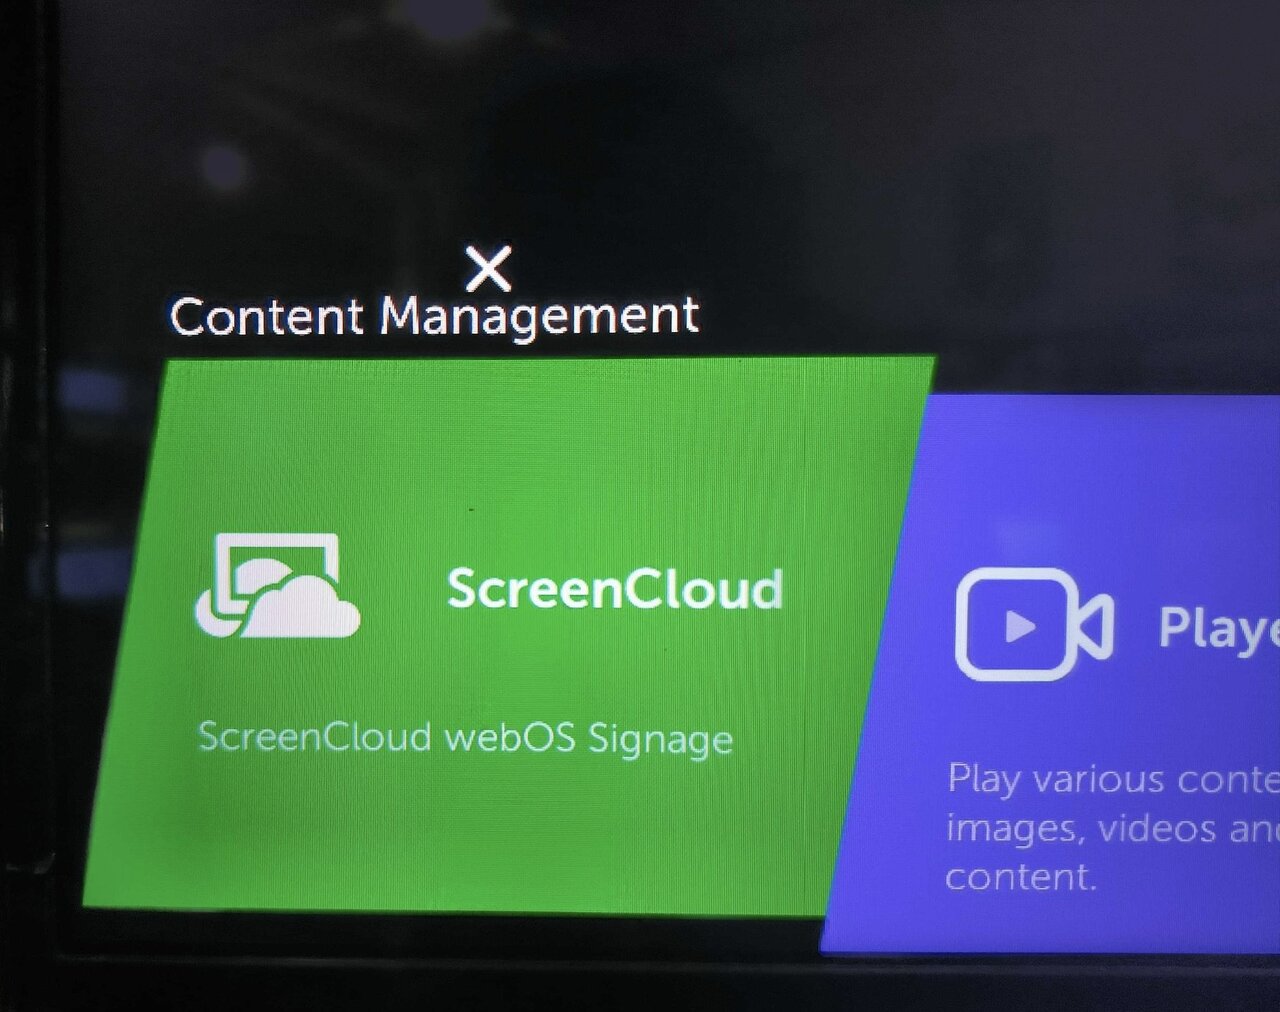
LG commercial displays often ship with — or were previously configured to run — third-party signage apps such as ScreenCloud, Digisigns, or LG SuperSign. Remove them before installing Digisigns, or both apps will try to autolaunch and conflict.
Via the Home screen (webOS 3+)
- Press HOME on the remote to open the app drawer.
- Highlight the third-party app (do not open it), then press UP (or hold OK on some remotes) to enter edit mode — a small × appears above the tile.
- Select ×, press OK, confirm Yes, then power-cycle the display.
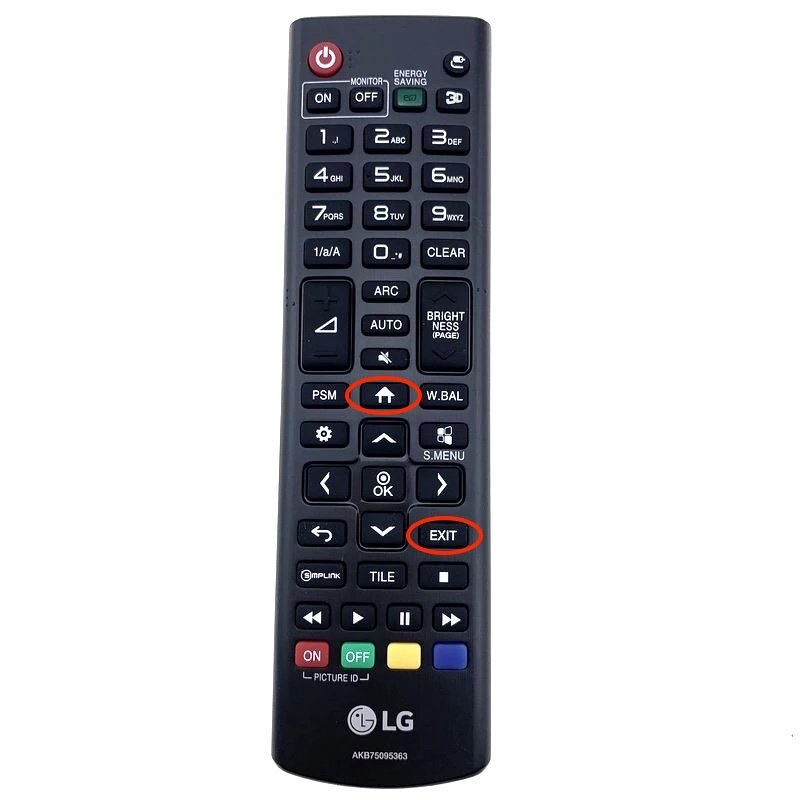
HOME (upper circle) opens the app drawer; EXIT (lower circle) returns to the default input.
Via SI Server Setting reset
If the delete icon is not available (some locked-down firmwares), open SI Server Setting, tap RESET (top-right), confirm, then reinstall Digisigns from Step 3 — the new IPK overwrites the previously-installed app. For a completely clean slate, perform a Factory Reset (Settings → General → Reset to Initial Settings) first.
Post-install validation
- A 6-digit activation code appears within 60 seconds of boot.
- The device pairs at admin.digisigns.in and reports Online with a recent heartbeat.
- The assigned playlist begins playing within 30–60 seconds.
- Power-cycle test: unplug the display, wait 10 seconds, plug back in — the player must auto-launch and resume playback without intervention.
Troubleshooting
- 'Application Type: IPK' is missing — the firmware is older than webOS 4.0. Update the firmware, then retry.
- 'Connection failed' or SSL error — wrong date/time (enable Set Automatically), or a firewall is blocking
www.digisigns.in(see the firewall requirements). - Blank screen after Upgrade Complete — set Application Launch Mode to Local, save, and reboot.
- The old signage app still shows — it was not fully removed; uninstall it, perform a factory reset, and reinstall.
- Pairing fails — enter the code within 10 minutes (codes expire); reboot the display to generate a new one.
To remove Digisigns later, see Uninstalling from LG webOS. Need help? Email support@digisigns.in.